


How to Install a New CPU Fan for Better Cooling Performance
Installing a new CPU fan can significantly improve cooling performance, extend component lifespan, and enhance overall system stability. In this guide, we’ll walk you through the steps required to replace your old CPU fan effectively and safely.
1.Signs Your CPU Fan May Be Failing
A faulty CPU fan often reveals itself through unusual operational noise—such as clicking, humming, or irregular vibrations—typically caused by aging bearings or debris buildup. In some cases, the fan may stop working altogether, causing unexpected temperature spikes, particularly when running demanding software or multitasking.
Another common symptom is a steady increase in CPU temperature, often climbing above 85°C even during light usage. If you're experiencing performance drops, game stuttering, or brief freezes, your system may be automatically slowing down the processor to avoid overheating.
Additionally, many users first learn of cooling issues through startup warnings, like a “CPU Fan Error” message in the BIOS. If ignored, these problems can escalate into random reboots, system instability, or even permanent hardware damage—making early diagnosis and replacement essential.

2. Preparing for Installation
Before replacing your CPU fan, it’s important to take the proper precautions to ensure both your safety and the integrity of your system. Start by shutting down your computer completely and disconnecting the power cable. This reduces the risk of electrical shock or accidental component damage during the installation process.
Next, remove the side panel of your PC case to access the internal components. Locate your existing CPU cooler—it’s typically mounted directly over the processor in the center of the motherboard.
Before proceeding, make sure you have the following tools and materials ready:
Item | Purpose |
New CPU fan | Replacement for the old or faulty cooler |
Phillips screwdriver | Used to loosen and tighten mounting screws |
Isopropyl alcohol + cloth | To clean off old thermal paste from the CPU surface |
Thermal paste | To ensure effective heat transfer between CPU and cooler |
Antistatic wrist strap (optional) | To prevent electrostatic discharge while handling components |
Having everything prepared in advance makes the installation process smoother and minimizes the chances of missing a step or damaging components.
3. Removing the Old CPU Fan
With the system powered off and the side panel removed, you can now safely uninstall the old CPU cooler fan. Start by unplugging the cooler fan cable from the motherboard, typically connected to a header labeled “CPU_FAN.” Carefully disconnect it without pulling on the wires.
Next, loosen the mounting hardware—this may involve unscrewing four corners, releasing a retention bracket, or disengaging side clips, depending on your cooler fan and socket type. Loosen each point gradually to avoid flexing the motherboard.
After releasing the mount, gently lift the heatsink off the CPU. If it feels stuck, apply a slight twist to break the seal created by dried thermal paste. Finally, clean the CPU surface using isopropyl alcohol and a lint-free cloth or paper towel to remove any residual compound. A clean surface ensures effective heat transfer when the new cooler is installed.

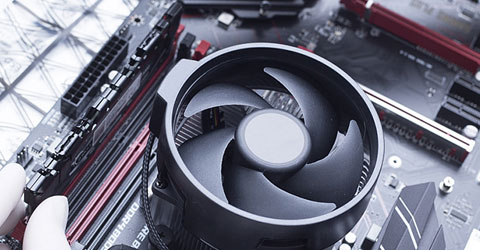
4. Installing the New CPU Fan
Before placing the new CPU cooler fan, ensure the CPU surface is completely clean and dry. Then, apply a small amount of thermal paste—about the size of a pea or a thin line—directly to the center of the CPU. Most coolers come with pre-applied paste, so you can skip this step if that's the case.
Next, position the new heatsink over the CPU, aligning it with the appropriate mounting brackets for your socket type (Intel or AMD). Carefully lower it into place, making sure not to smear the thermal paste. Once aligned, secure the cooler fan according to the manufacturer’s instructions, whether by tightening screws, latching retention arms, or snapping clips into place. Avoid overtightening, as this can damage the motherboard.
Once the heatsink is firmly mounted, connect the fan cable to the correct header on the motherboard—usually labeled “CPU_FAN.” Double-check that the cable is not obstructing other components or airflow paths.
Before closing the case, verify that the fan is properly seated, the cable is connected, and the heatsink is stable. A properly installed CPU fan will ensure even pressure on the CPU and optimal heat dissipation during operation.
5.Powering Up and Verifying Functionality
After installing and connecting your new CPU fan, the next step is to confirm that it’s functioning correctly. Reconnect the power supply, turn on the system, and access your BIOS or UEFI settings by pressing a designated key—commonly Delete or F2—during boot-up.
Once inside the BIOS, head to the hardware monitoring section to check that the fan is spinning and its speed (RPM) is being detected. This confirms proper electrical connection and communication with the motherboard.
Exit the BIOS and boot into your operating system. You can then use tools like HWMonitor, Core Temp, or Open Hardware Monitor to keep an eye on your CPU temperature in real time. Under normal idle conditions, temperatures should drop to around 30–45°C, depending on your setup and ambient airflow.
If your fan supports PWM (Pulse Width Modulation) control, you can further refine performance by adjusting the cooler fan curve in the BIOS or via bundled motherboard software. This allows for quieter operation at low loads while maintaining cooling efficiency under stress.
Verifying these parameters ensures that your new CPU cooler is not only installed properly, but also delivering the expected thermal improvements—setting your system up for better performance and longer component lifespan.

Learn more:
Best Cooling Fans of 2025: Smart, Silent, and Powerful for Every Space (yccfan.com)
Conclusion:
Proper installation of a high-quality CPU cooler fan not only ensures your computer operates efficiently but also protects it from heat-related performance degradation and damage. Regularly monitoring your CPU temperature and maintaining your cooling components will help keep your system running smoothly and reliably for years to come.
